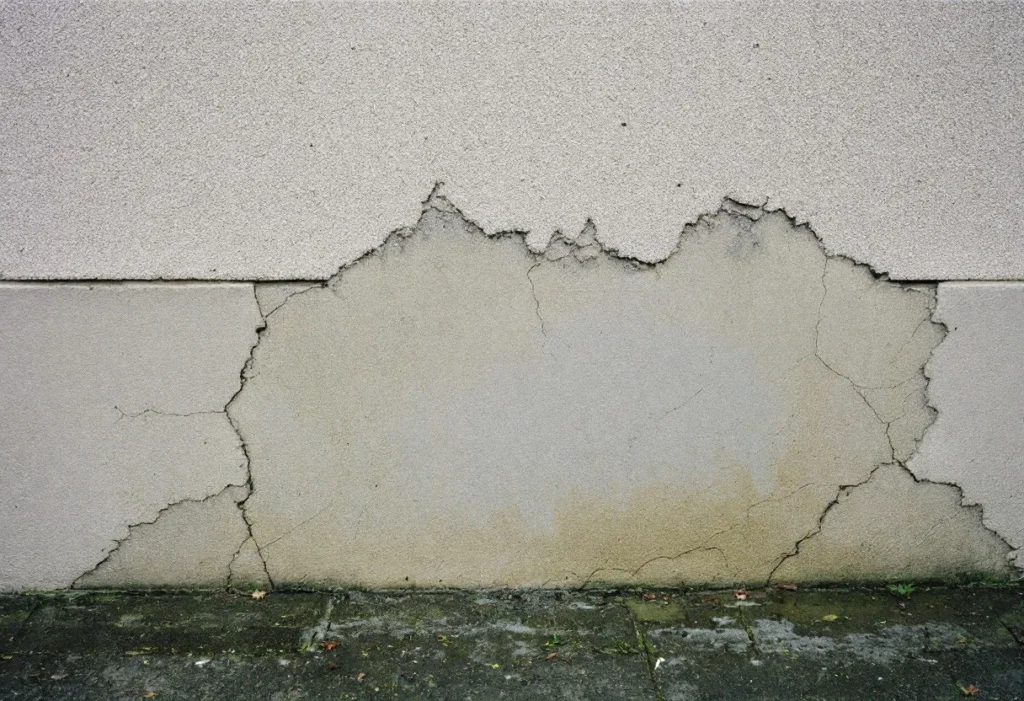
Render fails in a handful of ways you can see from the ground: fine crazing, larger cracks, patches that bulge or sound hollow, render lifting at the base or around windows, damp patches inside, and green staining outside. Pebbledash shows the same faults, with stones and whole patches falling away.
This guide explains what each sign points to, which causes to deal with first, and when to patch, re-render or remove pebbledash. Inspect from the ground. Historic England suggests binoculars for high areas where safe access is not available[3].
Which signs point to repair, and which to a re-render?
Several signs share a cause, so the table pairs each one with what to check before choosing.
Common render problems and where they lead
| Sign | What it can point to | Check first | Where it usually leads |
|---|---|---|---|
| Fine hairline crazing | Shrinkage: hard cement renders always develop shrinkage cracks, gaps or joints where water can get in[2] | Whether the render around it is still firm | Repair and redecoration while the render is sound |
| Larger cracks | Water getting into the wall behind[1], or movement in the wall itself[4] | Whether the crack is growing; leaking drains or large trees nearby[4] | Repair once movement is ruled out or dealt with |
| Hollow or bulging areas | Blown render that has lost its bond with the wall | How much of each elevation is affected | Patch repair if small; re-render if widespread |
| Render coming away at the base | Damp at the foot of the wall, often from raised patios or beds[2] | Ground at least 150 mm below the damp-proof course[3] | Lower the ground, then repair |
| Render lifting around openings | Water getting in at gaps and joints[2] | Sills, flashings and weathering details[3] | Local repair after the leak is fixed |
| Damp patches inside | Rain through cracked render[1], leaking gutters or raised ground outside[2] | The source of the water, before any damp treatment[2] | Depends on the cause |
| Green staining and algae | Problems with drainage, flashings or weathering details[3] | Gutters and downpipes for blockages and leaks[2] | Clean and repair once the water is controlled |
| Failing pebbledash | The same faults in a render faced with gravel[1] | How much is still bonded | Patch if limited; remove and re-render if widespread |
Scroll sideways to see all columns
How to recognise each problem
Hairline crazing and larger cracks
Historic England notes that cement-based renders always develop some shrinkage cracks, however carefully they are applied[2]. Larger cracks matter more, because cracked render lets damp into the wall behind[1]. Note where each crack runs and photograph it next to a ruler. Some movement in old houses is seasonal, and some is historic, with no movement now[4]. A crack that keeps widening is the one to act on.
Hollow or blown render
Blown render has lost its bond with the wall but is still in place. It may bulge, crack around the edges or sound hollow when tapped. Whoever assesses the wall maps the hollow areas before deciding between a patch and a full re-render. On upper floors, that is done from a scaffold or tower, not a ladder.
Render coming away at the base or around openings
Historic England's checklist says ground levels should be at least 150 millimetres below any known damp-proof course, or below internal floor levels[3]. Raised patios and flower beds are a common way for moisture to get in sideways at the base of a wall[2]. Around windows and doors, check the sills, flashings and weathering details[3].
Damp patches, staining and algae
Blocked or leaking gutters and downpipes are among the most common causes of moisture getting into buildings[2]. Green staining, algae or plants on the wall can point to problems with drainage, flashings or weathering details[3]. Plants growing in a gutter usually mean it is blocked[2].
Failing pebbledash
Pebbledash, also known as roughcast, is a form of render that includes gravel[1]. Any patch should match the original as closely as possible[1], which means matching the stones and the texture as well as the mix.
What usually causes render to fail?
Most of the signs above come back to three causes:
Water getting in behind. Through cracks and joints, at the base where the ground has built up, and at the top of the wall, where water from roof or gutter defects tracks down through cracks inside it[2].
Cement render on an older solid wall. In an old house, the render, plaster and mortar would have been lime based, which lets excess moisture evaporate easily[5]. Cement renders can trap moisture so that it builds up over time[2]. Historic England warns that impervious repairs can make a wall decay even faster[1].
Movement in the wall. Older homes were usually built with shallow foundations. Leaking drains or rainwater pipes can cause settlement, and clay soils near large trees add to the risk[4].
When damp or movement needs assessing first
Two causes need assessing before anyone prices the render, because new render over either leaves the problem in place.
Damp. Find the source before choosing a treatment. Historic England warns that a few high meter readings will not reveal the cause or extent of a damp problem, nor justify costly and invasive measures[2]. Damp from built-up ground outside is often mistaken for rising damp[2]. If a new damp-proof course does turn out to be needed, installing or replacing one does not need Building Regulations approval in most cases[11].
Movement. Cracks in an older house are not always a concern. Historic England says to worry only when movement is ongoing and threatens the use or safety of the structure. If you suspect it is ongoing, have a structural engineer familiar with old buildings inspect it[4]. Underpinning foundations is building work under the Building Regulations. A trial hole is usually dug beside the footings so an engineer or surveyor can assess them first[12].
When is a patch repair enough?
A repair keeps most of the render and replaces only what has failed. It suits a wall where:
- the cracks or hollow areas cover small parts of an elevation
- the cause has been found and fixed, whether a gutter, raised ground or a leaking sill
- the render around the damage is still firmly bonded
- the existing render suits the wall, rather than cement trapping damp in an older solid wall
Match the repair to the original wall as closely as possible[1]. On an older wall finished in lime, that means lime, not cement[5]. You do not need planning permission for repairs and maintenance[6], and redecorating an existing wall would not normally need Building Regulations approval. Renovating an external wall, though, is likely to mean upgrading its insulation[8].
When does a full re-render make sense?
A full re-render takes the old coat off and starts again. It makes sense when hollow areas are widespread, repairs keep failing, cement render is trapping damp in an older solid wall, or you want a different finish. Two sets of rules can apply.
Building Regulations. Under regulation 23, where more than 50% of a wall's surface area is renovated, the whole wall must be brought up to the energy standard, in so far as that is technically, functionally and economically feasible[13]. The Planning Portal's homeowner page gives a lower figure, saying the regulations would normally apply where 25 per cent or more of an external wall is re-rendered[7], so ask building control early. Approved Document L sets an improved U-value of 0.30 W/m²K for a wall insulated internally or externally. If that is not technically or functionally feasible, or would not pay back within 15 years, the wall is upgraded as far as those tests allow[9]. In historic and traditional houses built to absorb and release moisture, such as those using lime render or mortar, insulation should be improved only if it will not cause long-term deterioration of the fabric[9]. A new edition of Approved Document L takes effect on 24 March 2027 for most building work[10].
Planning. In a conservation area, National Park, Area of Outstanding Natural Beauty or the Broads, you need planning permission before cladding a house with render or pebble dash. Outside these areas, no application is needed if the materials are similar in appearance to those of the house. A listed building needs listed building consent for any significant works[6].
Once a re-render is the answer, the next decision is the system. The guide to choosing a render system for the re-render compares silicone, monocouche and sand and cement. Rendering can be booked with us as a standalone job, and the exterior rendering page explains what the work includes.
What does removing pebbledash involve?
Taking pebbledash off is a full re-render with an extra step. The old coat comes off, the wall behind is inspected and repaired, and a new render system goes on. Because the whole wall is re-rendered, the Building Regulations point above normally applies[7].
Two checks come first. In the areas listed above, the new render needs planning permission[6]. Elsewhere, a smooth or coloured render changes how the house looks, so ask the council whether it counts as similar in appearance. On an older solid wall, find out what the pebbledash sits on. A lime-based finish lets moisture evaporate, and what goes back on should do the same[5].